Monday, June 23, 2014

23 June 2014 – Gear Review 6 – Misc Bike Add-ons


This is a list of items I added to the bike and my opinion of their performance:

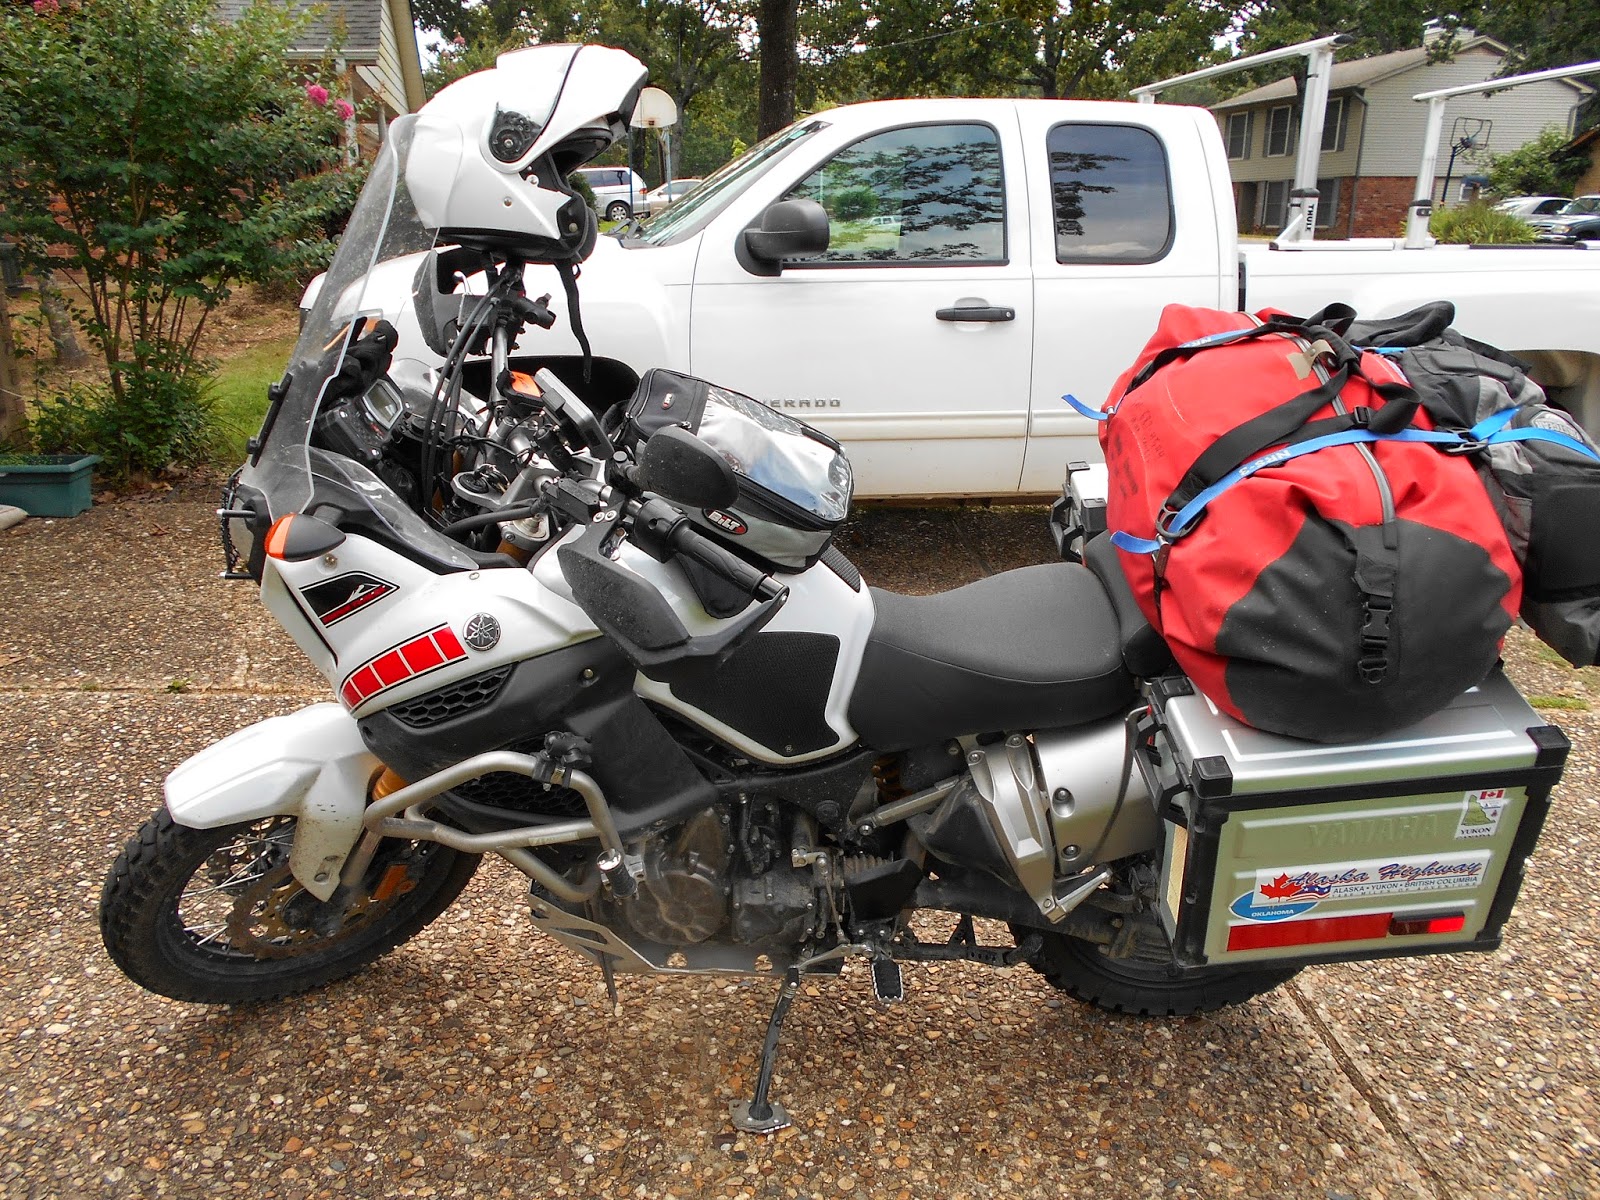
Rear rack – I replaced the plastic and smaller OEM rack with the AltRider rack. It was fantastic. Provided good secure tie down point for my large red bag plus rain gear and it was the mounting point for my RotoPak reserve fuel tank. I also stored extra oil, lifting strap and brush under the rack in a storage shelf. Good quality and extremely strong.

Crash Bars – I used AltRider crash bars and they proved their strength when the bike dropped due to my incompetence. Didn’t even scratch the bars and they are mounted solidly to the frame at multiple points. They protect the radiator on the left and all the electrics on the right.

Skid Plate – I used AltRider (see a trend) skid plate. Again top quality and strong.

Head Light Grill – I believe this is a Hepco & Becker unit but anyone of a number of ones will work. Some are clear and use just Velcro to attach. I didn’t like that approach so went with the bolt-on type.

Windshield – I used a CalSci (California Scientific I think) and it was excellent. Great optics and did great job keeping wind blast down. Be sure to use their directions on determining height from the web page. I wanted to be able to ride looking over the windshield since it will get most of the bugs while deflecting them over your helmet keeping helmet shield cleaner. If you elect to ride looking through your windshield, carry lots of rags and cleaner. As a side note, I also had installed the OEM lower wind deflectors. I thought this combination would keep most of the wind off of me and it did fairly well. The only issue I had was the top of both arms got lots of wind and it generated turbulence around my helmet causing lots of wind noise. If I lowered my arms the noise and turbulence went away.

RAM Mounts – Love Ram-Mounts. They have every type you will ever need and are good quality products.

Foot Pegs – My crash bars are higher than the OEM bars so don’t work real well for foot pegs, at least that’s what I thought at first. After the 2400 mile ride to Washington I determined I needed something so I could stretch my legs while riding. I bought cheap ($19) pegs at the Yamaha dealer and they worked perfectly to extend my butt tolerance range.

Side Stand Foot – Several different brands available but a must have item on this bike. You will park a lot on soft dirt up north including even at the gas pump. Jim had to use a round plastic item under his kick stand while all I did was use my normal stand with added foot.

Throttle Lock – MUST HAVE. I would not have been able to make this ride without a throttle lock. Several different types but I used the Excel Throttle Control and it was a fantastic product. Top quality construction and easy to use while riding. Small operation but very customer focused. He actually sent it to me before receiving payment because I ordered close to departure time.

Fender Extender – The OEM fender is a little short and puts road spray/mud right on the front of the engine and header pipes. I added a good quality extender (carbon fiber) and it kept the engine almost mud free. My only concern would be riding real heavy mud and it jamming up the front wheel. Bike fender is easy to get off for cleaning if this became an issue.

Tank Bag – Must Have. This is where I stored everything for which I needed ready access; bill fold, sunglasses, cell phone, extra gloves, windshield cleaner, etc. Get one that is water proof or has a tight fitting cover. I used just a generic waterproof bag cover and it was a pain because it would keep flapping in my face.

Spare fuel – RotoPak is the only way to go. Great locking mount. I wish I had carried two instead of just a single 1 gallon.


23 June 2014 – Gear Review 5 – CB Radio


During AK1 both Jim and I were on Harley Davidson Ultra Classics which meant we both had OEM CB radios. They worked flawlessly and made the trip more enjoyable and helped reduce the boredom. When I decided to change bikes, the lack of an OEM CB on the S10 was a problem I had to resolve.

There are not that many solutions for putting a CB on a motorcycle, in fact I only found 2. The best solution was a J&M radio system that mounted above the left handlebar grip, was waterproof and pretty self-contained. It also cost around $450-$500.

The 2nd solution and the one I used was a handheld CB; MidLand 75-822. It is not waterproof but they did have a harness that provided a push to talk button on the handlebar and head-set for the helmet. It was around $150-$200 with all the components. I figured I would find a cover for the radio in case of rain and I would use a RAM-mount to put it on my handlebar and the short antenna on the radio itself.

I had never even tested this installation until I arrived in St Louis two days before we started AK2. It actually worked OK so that is what we started with.

It worked well enough for the 2400 mile run to Washington and even the ride from Anchorage up to the Arctic Circle and back. Sometimes there would be a lot of static and hard to understand but not sure if that was my receiver or Jim’s transmitter causing the static. Other times it was clear.

The day we were heading back home on the ALCAN was the first rain we had encountered. The radio never got wet but it did get some spray around the windshield. The radio was working when we stopped for gas and when I started back up it wouldn’t even turn on. I suspected a fuse but had to wait until the end of the day to test my power outlet on the bike (it checked OK) and put a back-up battery pack on the radio (still wouldn’t turn on).

It failed at a critical point as we hit the worse road conditions on the ALCAN. Jim and I worked around it and we never had radio communication the rest of the trip.

I would NOT recommend this radio for motorcycle use. It isn’t waterproof and you will ride in the rain. The push to talk button used Velcro around the left handle but it was in the way of the clutch operation so I moved it to the base of my left mirror. This meant I had to take my hand off the grip to transmit; not good in times when both hands are required to control the bike. In addition, the radio did not have feedback in the ear phones when I transmitted. I never knew if I was actually transmitting or not as a result.

CB radio was good while on the Dalton Highway because you could communicate with the truckers and could hear when they were approaching dangerous sections. Other than that a Bluetooth inter-bike system would have been better. They are voice activated and a lot better sound quality.

I’m sending this thing back to Midland and will be interested in hearing what they say caused it to fail.


23 June 2014 – Gear Review 4 – Tires


I rode to Tumwater, WA from Little Rock, AR on the original street tires that came on the S10. I really don’t remember what brand they were but I had no issues on the way out and this stretch is also when we did the Iron Butt.

Before the trip I had researched possible tire options that would be better suited for the road conditions I expected to encounter on the Dalton Highway to the Arctic Circle and the road constructions on The ALCAN. The Heidenau K-60 Scout Dual Sport tire had a good reputation but I was not sure how well they would work on the several thousand highway miles we would ride once off the ALCAN. They are called a 50/50 tire because they are designed to do both equally well (off-road/highway).

I have to say I’m extremely happy with their performance. Off-road they provided the grip required without clogging the tread. This I expected. On the highway I hardly knew they were on the bike. I ran these tires hard (70-85 mph) all the way back home and all I can say is they were a little louder than the street tires but not objectionable. The only time I could feel the difference was at slow speeds coming to a stop; they would vibrate a little. I rode a lot in the rain so I was careful not to push cornering too aggressively just in case they didn’t grip as well under these conditions. They never felt like they were going to slide.

After about 5,000 miles since they were installed in Washington, the front shows hardly any wear but the back has worn down to the indicator groves. Still some life in the rear and don’t expect to replace anytime soon but when I do K-60s will go back on the bike.


23 June 2014 – Gear Review 3 – Misc OEM


This review will focus on a couple of basic S10 components that I didn’t like.

1                     The instrument panel works OK but they put the fuel display on the right side where it is blocked by the throttle cables. Especially when you are low on fuel it is totally out of view as demonstrated when I ran out of gas. The whole display is LCD so is not a light which would catch your attention. They have warning lights on the left side, it should include a low fuel warning light. In addition, when you go on reserve, the E starts blinking (not flashing like a light would) and the odometer starts counting up. This lets you know how far you’ve ridden since you went on reserve. I now know I can go 43 miles at highway speed (70 mph) before I actually run out of gas as demonstrated a couple of days ago but I only learned this valuable piece of information by doing it. I miss the old days where you had to actually turn a mechanical valve to go to reserve.

2                     The front shocks are reversed on this bike; shiny part on bottom. This puts it right in the mud and dirt. The S10 fenders have a minor deflection to keep some of it off the shiny part but not enough and nothing like the serious off-road bikes have. The reason this is important is it puts sand right where it can cause you shock seal to blow-out. I only saw one other S10 up north and his right shock seal had blown due to riding in off road conditions and the oil had drenched his right front brake caliper. I knew this was a possible problem with this design and had actually found some strap on boots that would protect the shock but didn’t have time to get them before our trip started.
 
BTW the LO on the display is for engine temperature since bike wasn't running when I took the pic.


23 June 2014 – Gear Review 2 - Panniers


The hard-shell boxes, saddle bags or Panniers (whatever you want to call them) I used on my bike were the Original Equipment Manufacturer (OEM) boxes which in this case were Yamaha. I paid big $$ for these boxes thinking they would be the best but I was so wrong. For a bike that performed so well Yamaha is selling crap for their adventure add-ons for much more $ than you have to spend for better quality aftermarket items. The OEM boxes look good and if you are in the 90% of people buying this bike that never go on an extended wild country trip then they will be OK. If you want boxes that are tough the look around. I saw a number of bikes with Tourtec and other boxes that would have been my choice if I had not bought the OEMs at the same time I bought the bike. Here the issues I have with the OEM boxes.

1                   They mount to the bike with plastic parts. The hanging rails bolted to the bike are metal and very strong but the box mounting gear is all plastic. There is pictures on one of the adventure forums where a guy dropped the bike and the whole mechanism broke off the box. He had to wire to box on to finish the ride.

2                   The key lock system is absolutely JUNK!! It feels so flimsy that I was concerned every time I opened the box or took a box off that it would break or the key would break.

3                   The key lock fills with dirt and then won’t work. I was able to finally clean out the dirt on my left box but what a pain on an adventure bike.

4                   The one time I dropped the bike while standing still it knocked the right box off its bottom mount which also jammed the release mechanism so I couldn’t get the box off to fix it. I finally stood on the bottom mount while lifting on the box to get it back on and relieve the stress so I could remove the box to look for damage. I do have to say it did not appear to damage the box in any way but the bottom mount is now only halfway inserted in its mount. Something I have to evaluate for cause later.

All I’m saying is look at other options before you by the add-ons from OEM.


23 June 2014 - Gear Review 1


I've had several requests from my motorcycle friends to tell them what worked (gear) and what did not. I am going to continue to use this Blog address to accomplish this plus eventually a final summary of what I would do differently. I'll only send out an announcement for this first Gear Review entry so if you want to read them all you will have to come back occasionally till I state that I am done in the last blog entry. I will probably do them all today.

The first item of course is the motorcycle:

2013 Yamaha Super Tenere (S10) XT1200Z
Twin cylinder, water cooled, 1200 cc
(You can Google the specs if you want more)

I can't say enough about this bike. I rode this bike hard (real hard) and it always delivered. I selected this bike over several contenders including the BMW GS1200 and the Suzuki V-Strom 1000. No other bikes on the market fit my needs. Of course there others that would do the job as well and even better but here were my requirements:

1                    Reasonable price (eliminated BMW)
2                    Available dealers on my route and at home (eliminated BMW again)
3                    Shaft drive (eliminated V-Strom)
4                    Good reviews on several adventure bike forums (all met this)
5                    Able to ride thousands of miles at highway speeds (70-85 mph) yet still ride the bad roads and road construction expected enroute (Only one I had doubts about was the V-Strom for the highway speeds)

I had no mechanical problems with the S10. Everything worked from day 1 till the end. It has lots of power and I could pass cars/trucks without downshifting even while riding at 70+ mph. I never took it out of Touring mode so the Sport mode may have even performed better.

When I had enough time to come to a complete stop before hitting dirt I would go to setting 2 on the traction control but a number of times we would be in the bad stuff so fast I had to ride it in setting 1. I never had a problem either way. I would get on the pegs while riding real bad roads but the Dalton Highway is too long to stand all the time while on gravel so rode it on the seat except for what I saw was worse than normal.

The seat is comfortable enough to do the Iron Butt; 1037 miles in 16 ½ hours. Is it an easy chair; no. You get used to after a couple thousand miles.

The handle bars are more dirt bike (straight) than cruiser (pulled back). This makes you ride in a more forward stance. It wouldn’t let me lean back on my bag and put my feet out front like on a Harley Davidson. I did add some cheap pegs on my crash bars at the Yamaha Dealer in Washington and this helped a lot. I could lay my leg on the peg to give it a rest and could even put my foot on them one at a time for a change in position. I can’t stress how important it is to have several seating positions so you can get the pressure off your butt. This is the only thing that let me make the miles each day.

The bike carried the load with no problems. I put the heavy stuff in the saddle bags but my red bag on top was still pretty heavy. The way I tied the bag on worked great. I could it on/off in 10 seconds and I could also tie my rain gear on the back. I’ll talk about the hard bags (saddle bags) in another review but they were big enough for what I needed.

With the red bag on back and the big hard shell bags on the sides I could not swing my leg over while getting on/off like most other bikes I’ve had. I finally used this process:

While the bike was on side stand I would stand on peg (left side) and then I could get my leg in front of the red bag and over to the right side. You have to make sure your body stays on low side until your right foot is ready to be put on the ground. This puts a lot of strain on the side stand but it handled it fine. Warning – the one time I dropped the bike was because I was tired and while mounting, my right foot caught on the red bag and I let my body move over to the center. The bike started going to the right and I couldn’t get my right foot down to stop it; CRASH!

The only other thing I will say is this bike really has a strange sound compared to all my other bikes. When I did my test ride before buying I noticed that as you accelerate hard the engine sounds like it is grinding accompanied with slight vibration. I thought something was wrong. After riding this bike for 10,000 miles I’ve determined that it must be how they restrict the performance in the touring mode to make it more docile. They either adjust the fuel flow or the ignition and this makes the engine sound like it isn’t running right. It doesn’t impact how the bike performs but it is strange to open the throttle and hear this sound.

Would I recommend this bike to my friends; absolutely. Would I buy it again; absolutely.

If you have any specific questions let me know.


Sunday, June 22, 2014

Day 21 - 22 June 2014 AK2 complete

I arrived home today at 5:00 pm after 23 days  and 7,668 miles on a motorcycle. Both Jim and I met all our objectives but sure glad to be home. I'll post more tomorrow; right now I'm going to relax.

Thanks for all those following our adventure.